Free Knitting Pattern: Dachshund Stuffy Toy Sweater
A super simple knit that will add a personal touch to an already cute handmade toy!
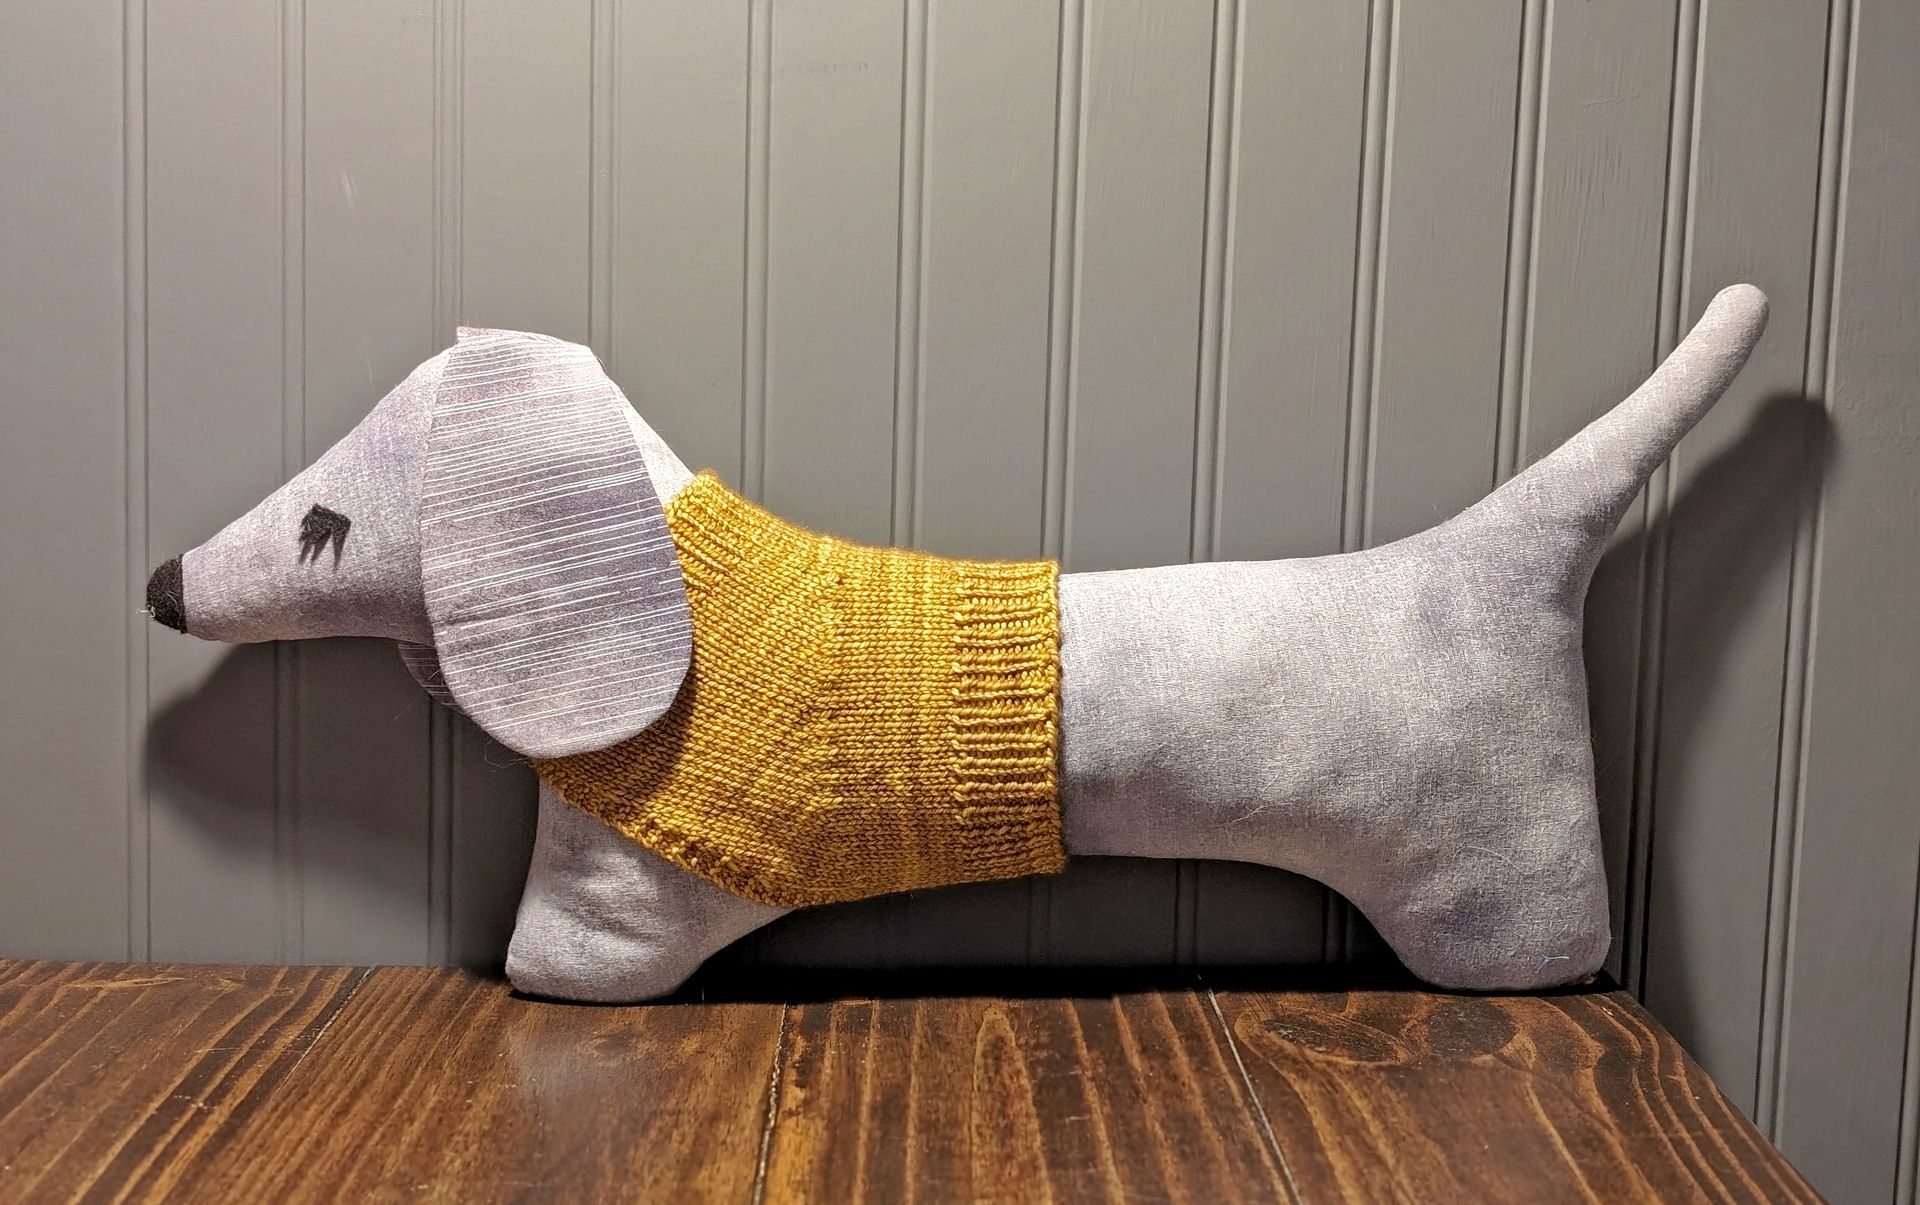
Make a little sweater for your dachshund stuffed animal! You can purchase the simple sewing pattern from Retro Mama on Etsy, and once you've finished the dog, it's time to dress it up in style.
Sewing the Dogs
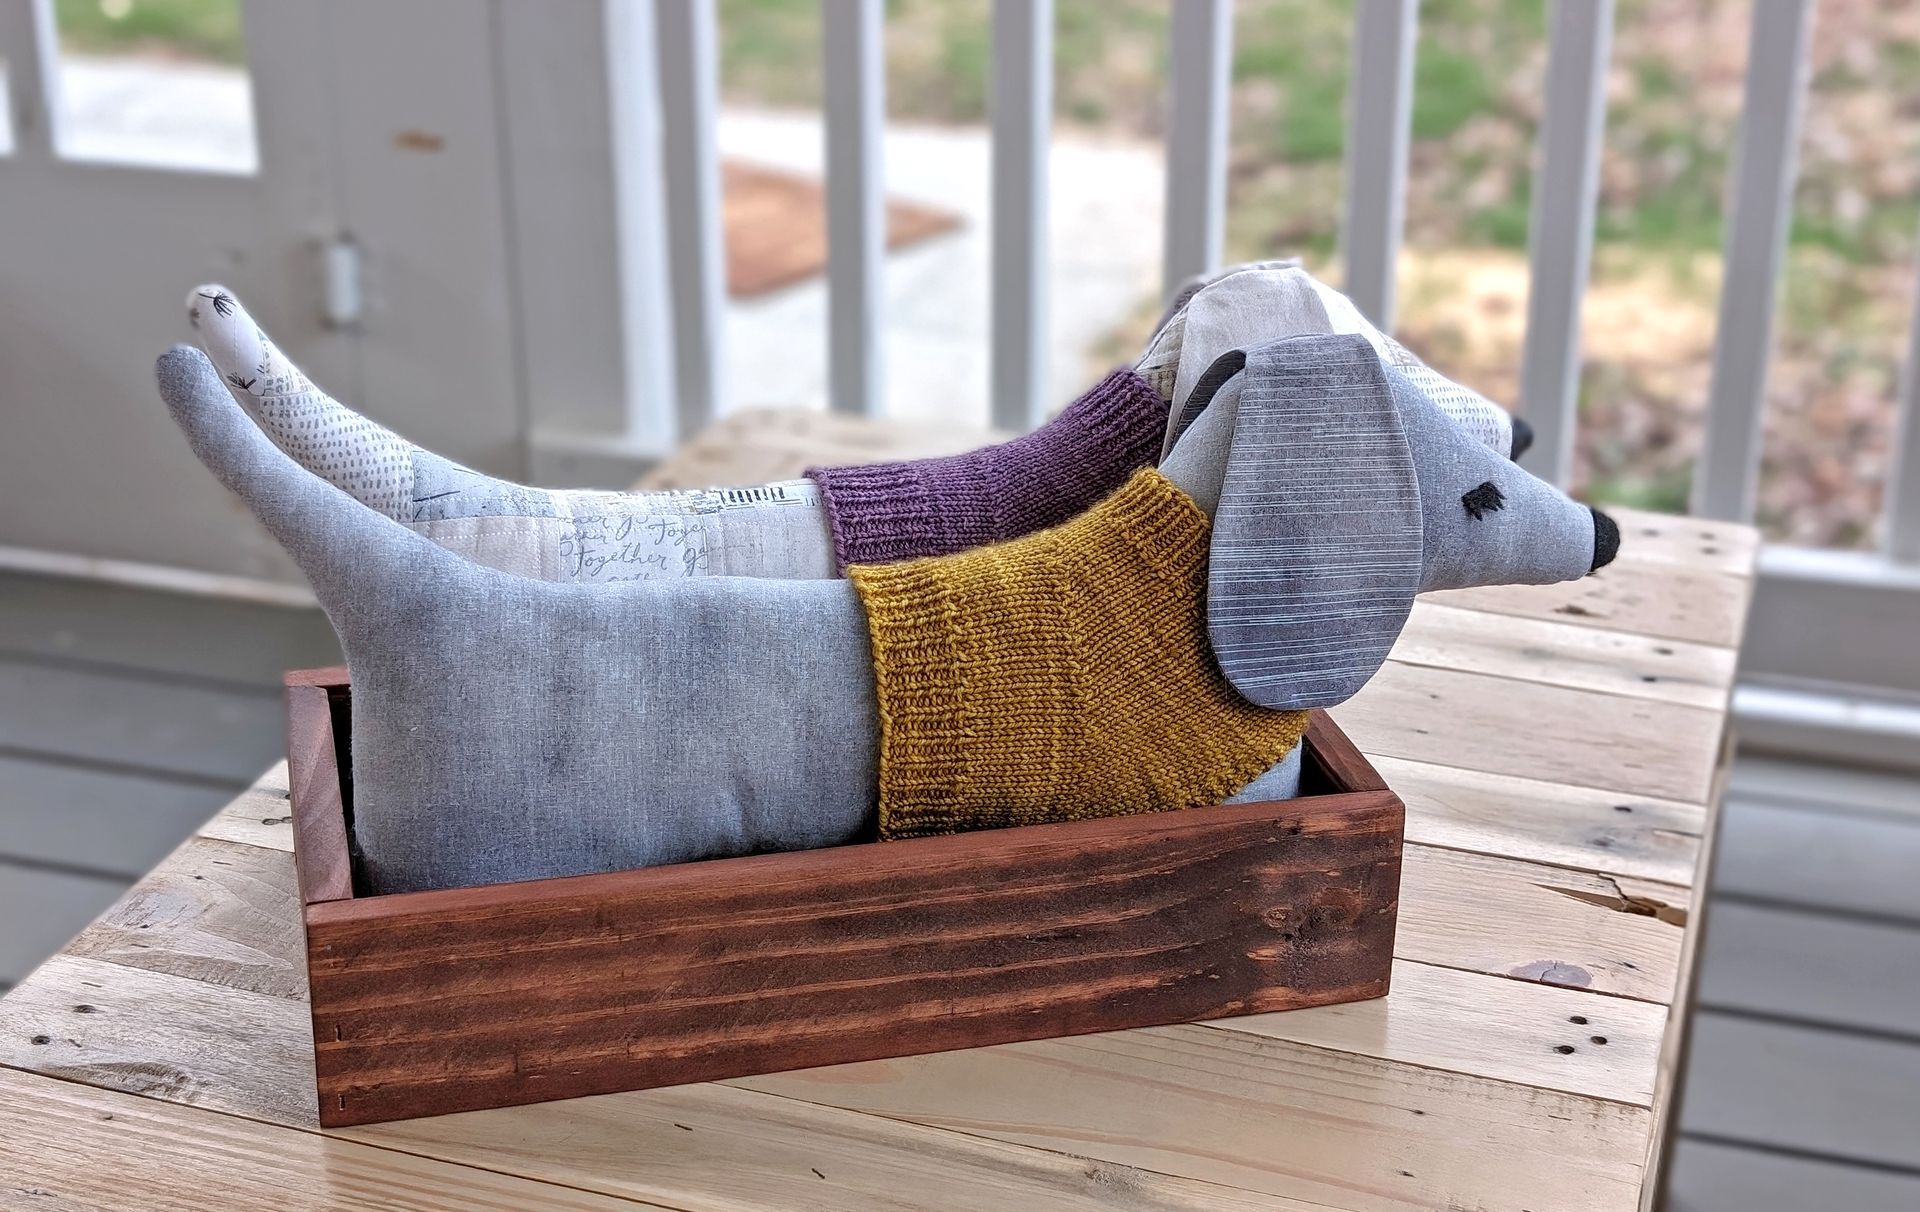
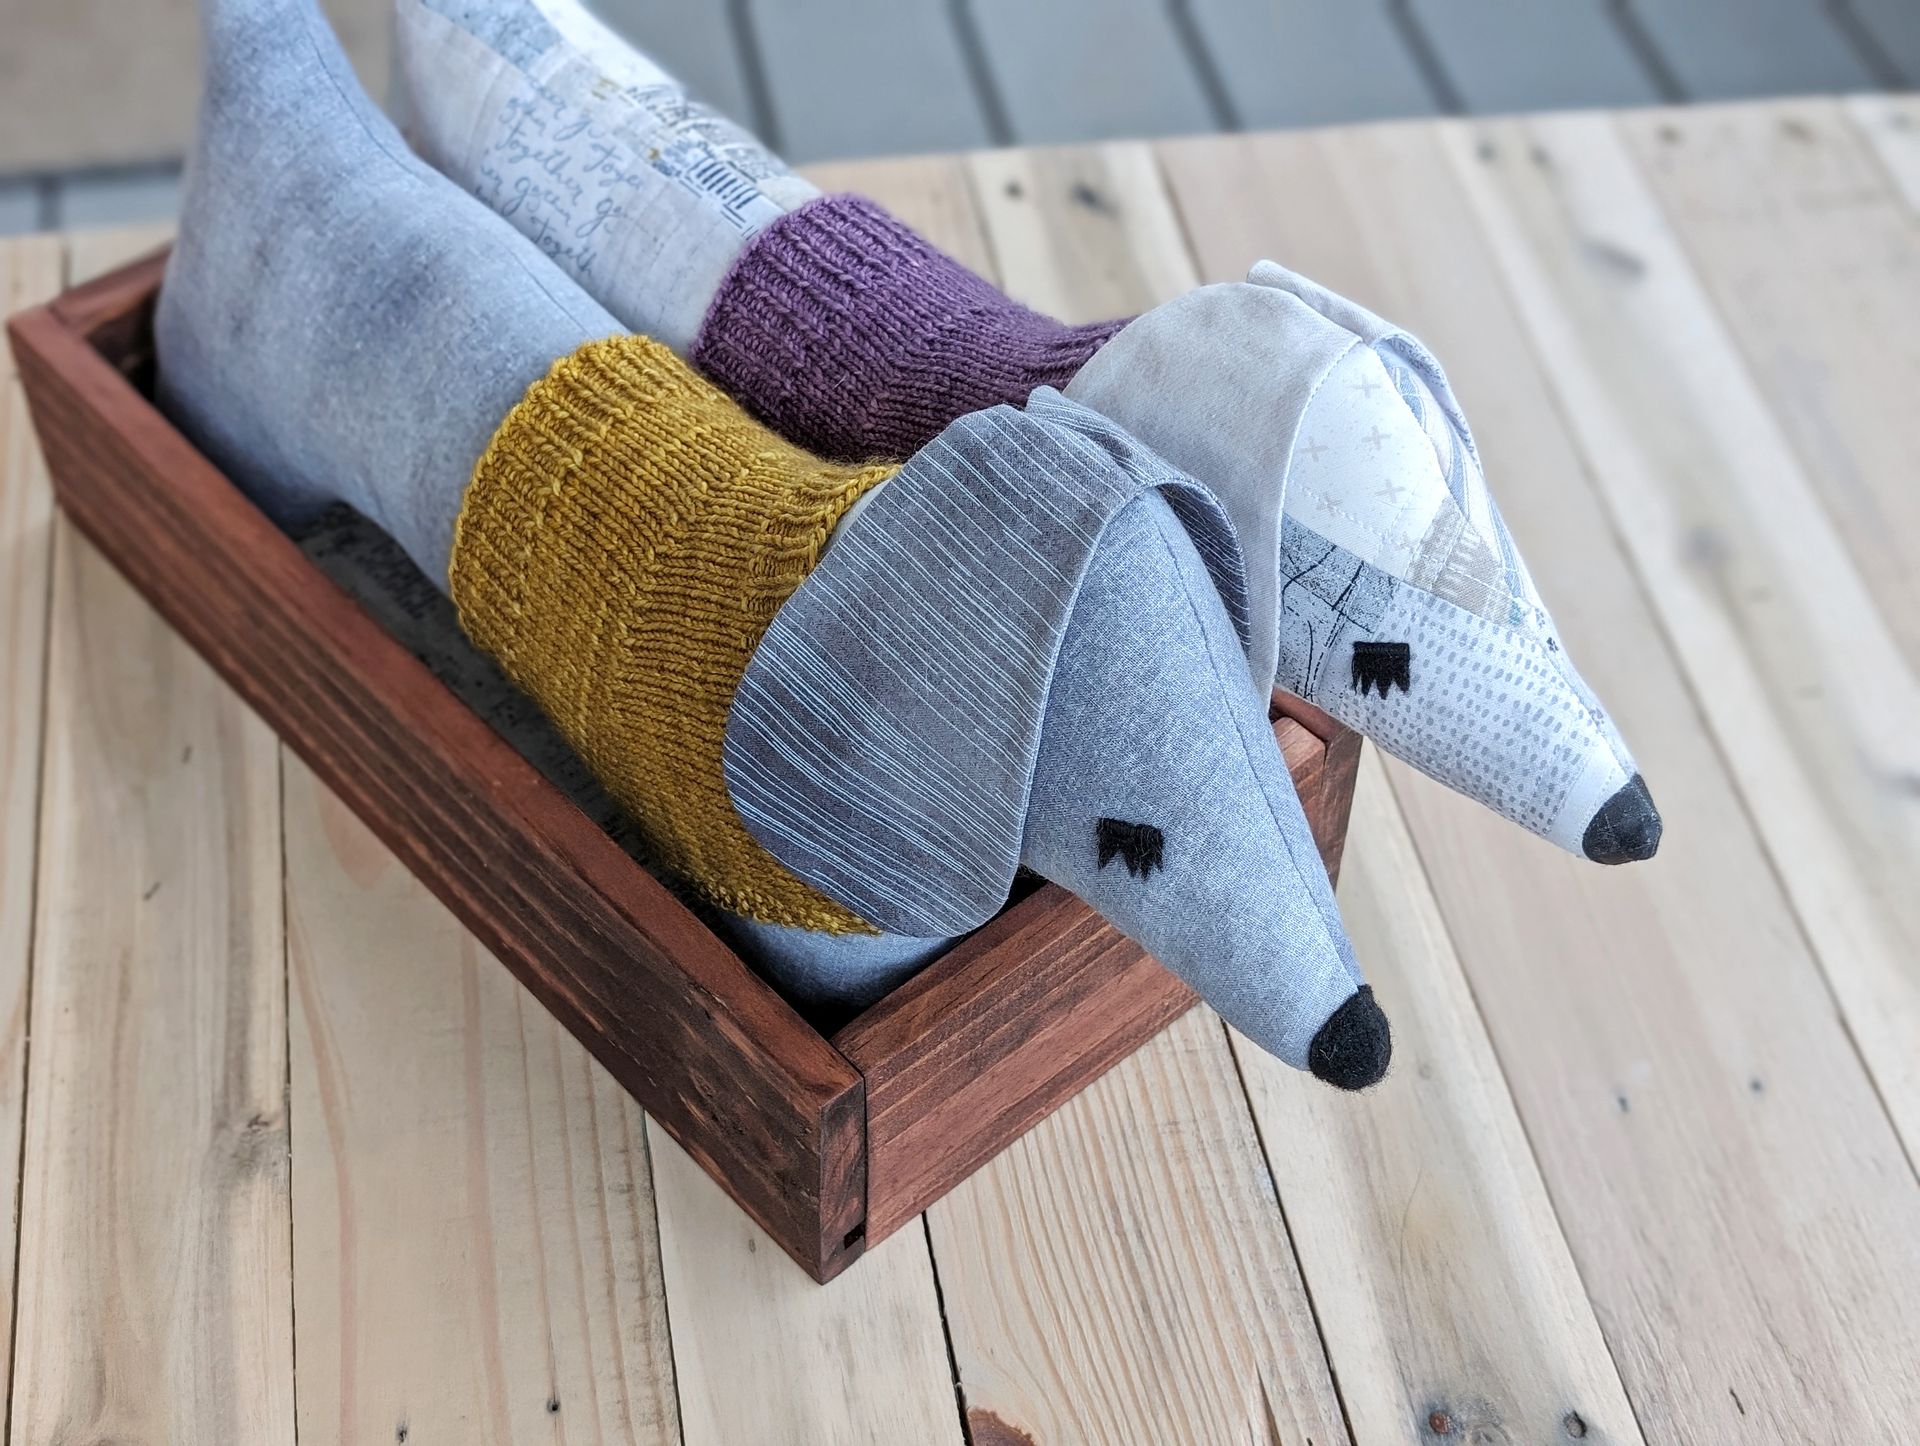
For my dogs, I printed the pattern at 105% scale so they would be a tiny bit bigger than the original design. For the patchwork version, I sewed 2.5-inch squares of fabric together to make a piece of patchwork fabric big enough to cut out the pattern pieces from, then quilted it with a layer of cotton batting (no fabric backing) by stitching .25-inch lines on both sides of the horizontal and vertical seams. When sewing the dog together, I did not use the triple stitch (though I did use it for the fabric-only gray dog). A felt nose was too bulky, so I colored in the nose with a black Sharpie Stained fabric marker; I actually like the colored nose better than the felt and will definitely do this for all future dogs that I make.
I really like the sturdiness of the patchwork dog compared to the fabric-only dog, but both are super cute.
I found the easiest way to stuff the dogs was to grab enough stuffing to make the basic shape of whatever portion of the dog I was working on (tail, leg, body, etc.) and then pack that in. It definitely took some work to get the stuffing smooth and relatively free of lumps. A perfect TV project!
Materials and Preparation
Materials
Yarn: 33 grams (about 85 yards) Blue Skin Yarns Angela Sport yarn, or similar (100% 17-micron merino wool, 285 yards per 115-gram skein)
Needles: US size 2 (2.75 mm) or size needed to achieve gauge and US size 1 (2.25 mm) or 1 size smaller than main needles used. You will need dpn (double-pointed needles) in both sizes for the first section, and then you can switch to standard needles or circular needles for the rest.
Other: Stitch markers and tapestry needle for seaming
Gauge
My knitting gauge for this project was approximately 22 stitches and 36 rows over 4 inches.
Want to use a different yarn weight or gauge? Is your dog larger or smaller than the pattern?
I've created a spreadsheet that will automatically calculate the number of stitches needed to cast on for any size yarn and any size dog, as long as it's made from Retro Mama's pattern; click here to view the spreadsheet. Simply make a copy of the spreadsheet to enter your own measurements and knitting gauge (obviously make sure to calculate your knitting gauge from the yarn you wish to use).
The spreadsheet will also calculate how many stitches you need to increase in the short-row section on each side to fit your dog's chest measurements, but due to the stretchy nature of knitting (especially ribbing), I recommend following the pattern as it is unless the spreadsheet indicates you should increase more than 8 stitches; in that case, I recommend increasing a few additional stitches.
Abbreviations
dpn = double-pointed needles
k = knit
k1p1 = knit 1 stitch, purl 1 stitch
p = purl
p1k1 = purl 1 stitch, knit 1 stitch
RS = right side
st = stitch/es
W&T = wrap and tuck (move yarn to opposite side you've been working, slip next stitch purlwise, turn work, slip next st back onto working needle; click here for more instructions)
WS = wrong side
The Pattern
With larger needles, cast on 60 st (or the number calculated by the spreadsheet. Divide st among 4 dpn and join to work in the round.
Rows 1-11: With smaller needles, k1p1 around.
Row 12: Switching to larger needles, k all st.
Row 13: P3, k to last 3 st, p3.
Row 14: Repeat Row 12. Turn work (we will no longer work in the round).
Row 15 (WS): K3, p to last 3 st, k3.
Row 16: K all st.
Rows 17-23: Repeat Rows 15 and 16 three more times, then work Row 15 once more.
Row 24: K 30 st, place marker, k 30 st.
At this point, try the sweater on the dog to make sure the length on the back lines up with the general area of where the sweater will join behind the leg on the belly. If it is too short, work a few more rows (repeating Rows 15 and 16).
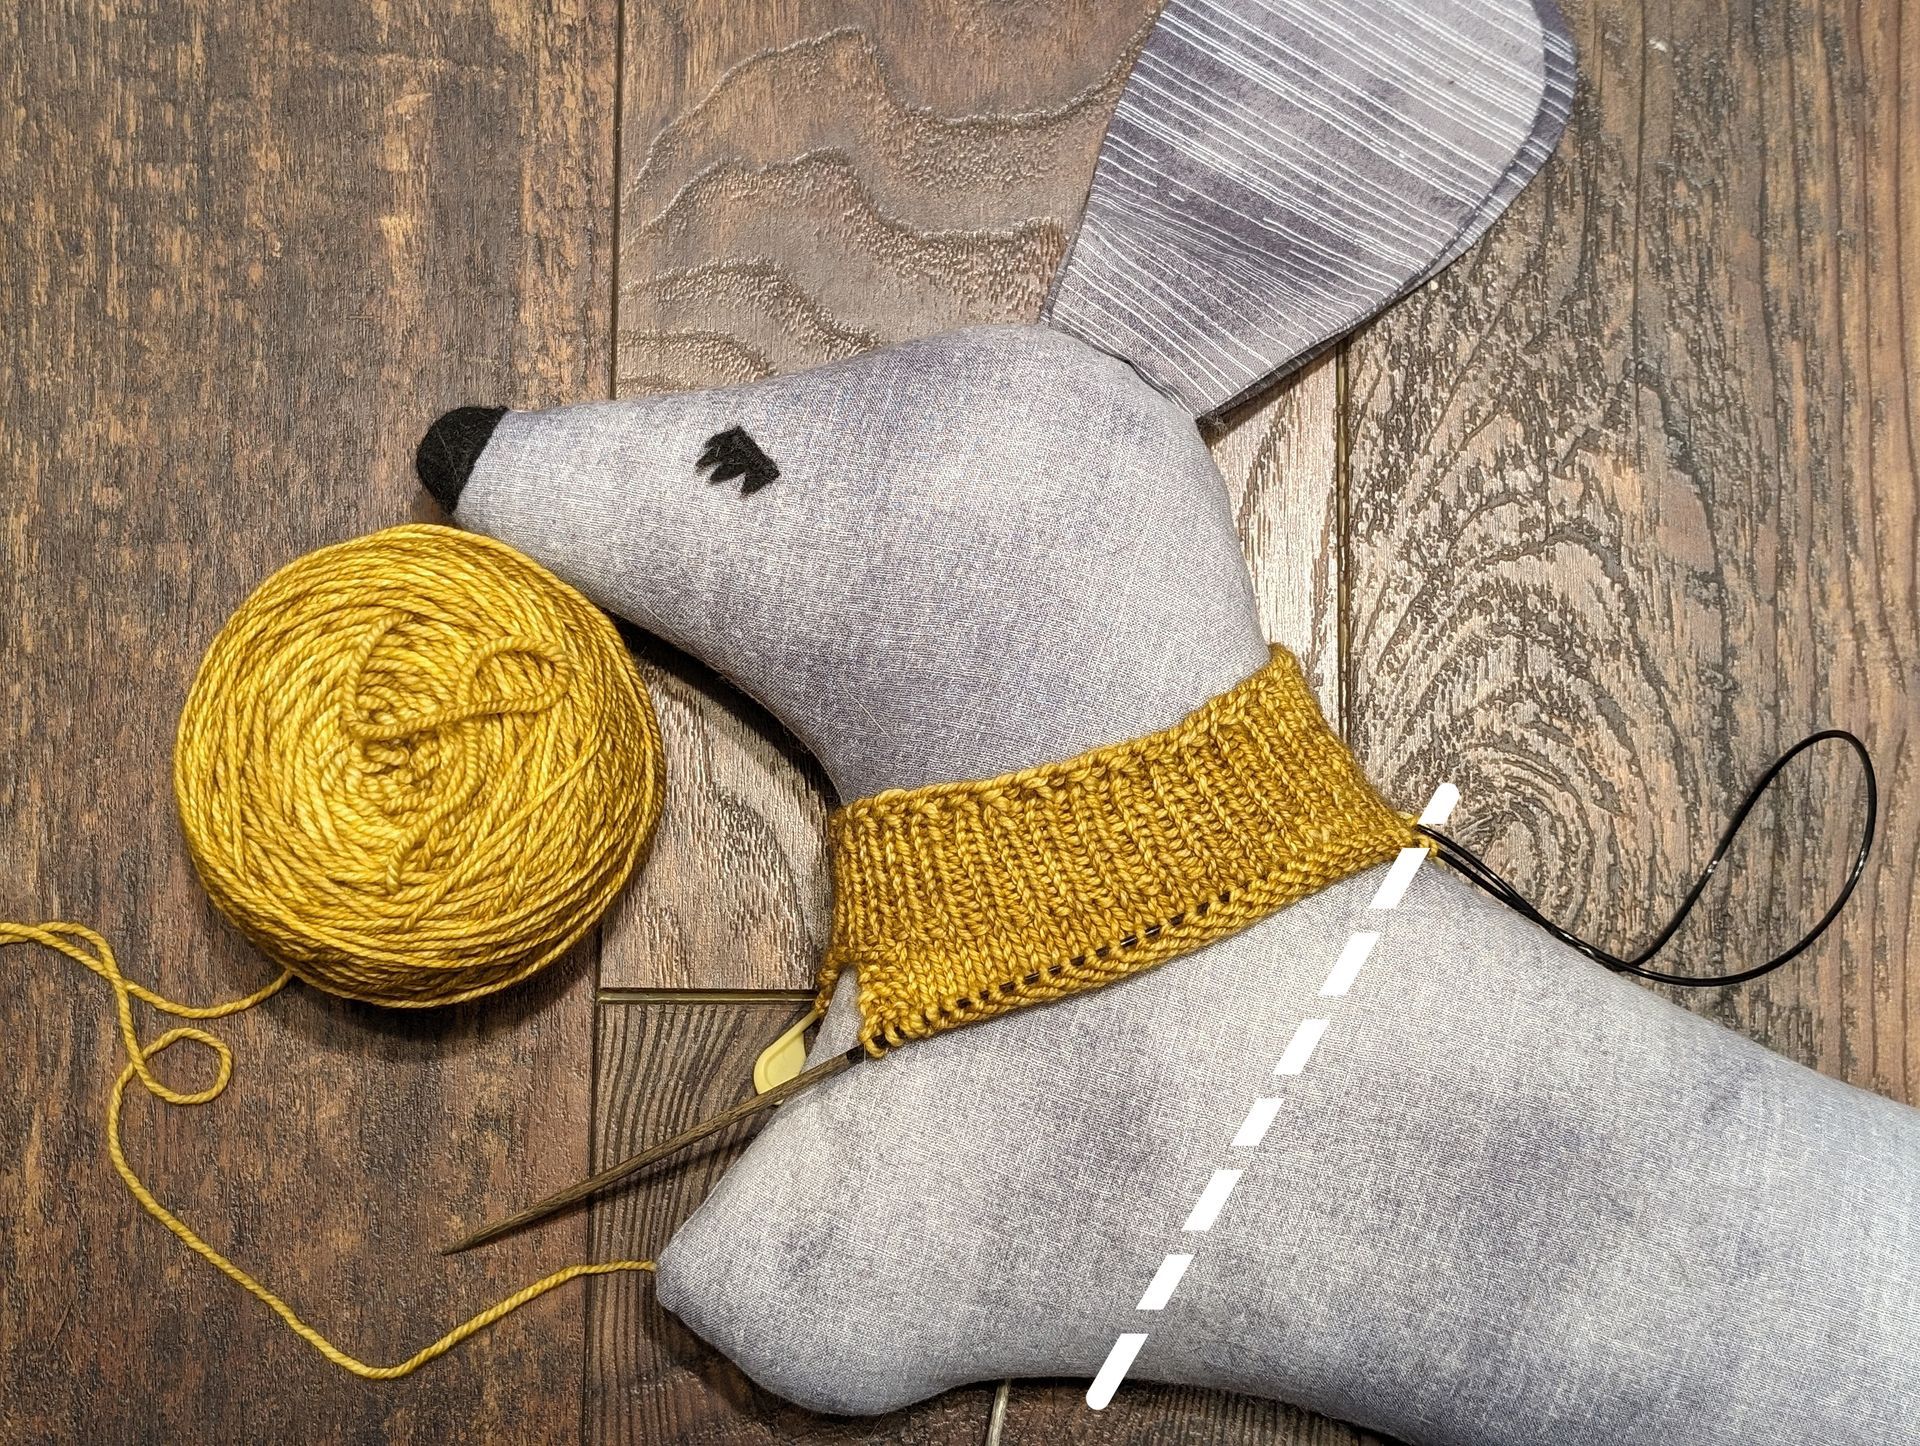
Row 25: K3, p to 4 st from marker, W&T, thus beginning the short-row section. If desired, place a stitch marker in this row to mark where you started the short rows. If your spreadsheet calculates that you need to increase more than 8 stitches in this section, continue to increase as desired at the end of every other RS row.
Short Row 1 (RS): K to end.
Short Row 2 (WS): K3, p to 3 st from last wrapped stitch, W&T.
Short Row 3: K to 3 st from end of row, M1R, k3 (1 increased). If desired, place a stitch marker in each added stitch.
Short Row 4: K3, p to 3 st from last wrapped stitch, W&T.
Short Row 5: K to end.
Short Row 6: K3, p to 3 st from last wrapped stitch, W&T.
Short Row 7: K to 3 st from end of row, M1R, k3 (1 increased).
Short Row 8: K3, p to 3 st from last wrapped stitch, W&T.
Short Row 9: K to end.
Short Row 10: K3, p to 3 st from last wrapped stitch, W&T.
Short Row 11: K to 3 st from end of row, M1R, k3 (1 increased).
Short Row 12: K3, p to 3 st from last wrapped stitch, W&T.
Short Row 13: K to end.
Short Row 14: K3, p to 3 st from last wrapped stitch, W&T.
Short Row 15: K to 3 st from end of row, M1R, k3 (1 increased).
Short Row 16: K3, p to 3 st from last wrapped stitch, W&T.
Short Row 17: K to end.
Short Row 18: K3, p to 3 st from last wrapped stitch, W&T.
Short Row 19: K to 3 st from end of row, M1R, k3 (1 increased).
Short Row 20: K3, p to 3 st from last wrapped stitch, W&T.
Short Row 21: K to end.
Short Row 22: K3, p to 3 st from last wrapped stitch, W&T.
Short Row 23: K to end.
Short Row 24: K3, p to 3 st from last wrapped stitch, W&T.
Short Row 25: K to end.
Row 26: K3, p to 3 st before opposite edge (resolving the wrapped st and slipping the marker as you come to them), k3.
Row 27: K to 4 st before center marker, W&T, thus beginning the short-row section on the left side of the sweater. If your spreadsheet calculates that you need to increase more than 8 stitches in this section, continue to increase as desired at the beginning of every other RS row.
Short Row 1 (WS): P to 3 st before end of row, k3.
Short Row 2 (RS): K to 3 st before last wrapped st, W&T.
Short Row 3: P to 3 st before end of row, k3.
Short Row 4: K3, M1L, k to 3 st before last wrapped st, W&T (1 increased).
Short Row 5: P to 3 st before end of row, k3.
Short Row 6: K to 3 st before last wrapped st, W&T.
Short Row 7: P to 3 st before end of row, k3.
Short Row 8: K3, M1L, k to 3 st before last wrapped st, W&T (1 increased).
Short Row 9: P to 3 st before end of row, k3.
Short Row 10: K3, k to 3 st before last wrapped st, W&T.
Short Row 11: P to 3 st before end of row, k3.
Short Row 12: K3, M1L, k to 3 st before last wrapped st, W&T (1 increased).
Short Row 13: P to 3 st before end of row, k3.
Short Row 14: K to 3 st before last wrapped st, W&T.
Short Row 15: P to 3 st before end of row, k3.
Short Row 16: K3, M1L, k to 3 st before last wrapped st, W&T (1 increased).
Short Row 17: P to 3 st before end of row, k3.
Short Row 18: K to 3 st before last wrapped st, W&T.
Short Row 19: P to 3 st before end of row, k3.
Short Row 20: K to 3 st before last wrapped st, W&T.
Short Row 21: P to 3 st before end of row, k3.
Short Row 22: K to 3 st before last wrapped st, W&T.
Short Row 23: P to 3 st before end of row, k3.
Short Row 24: K to 3 st before last wrapped st, W&T.
Short Row 25: P to 3 st before end of row, k3.
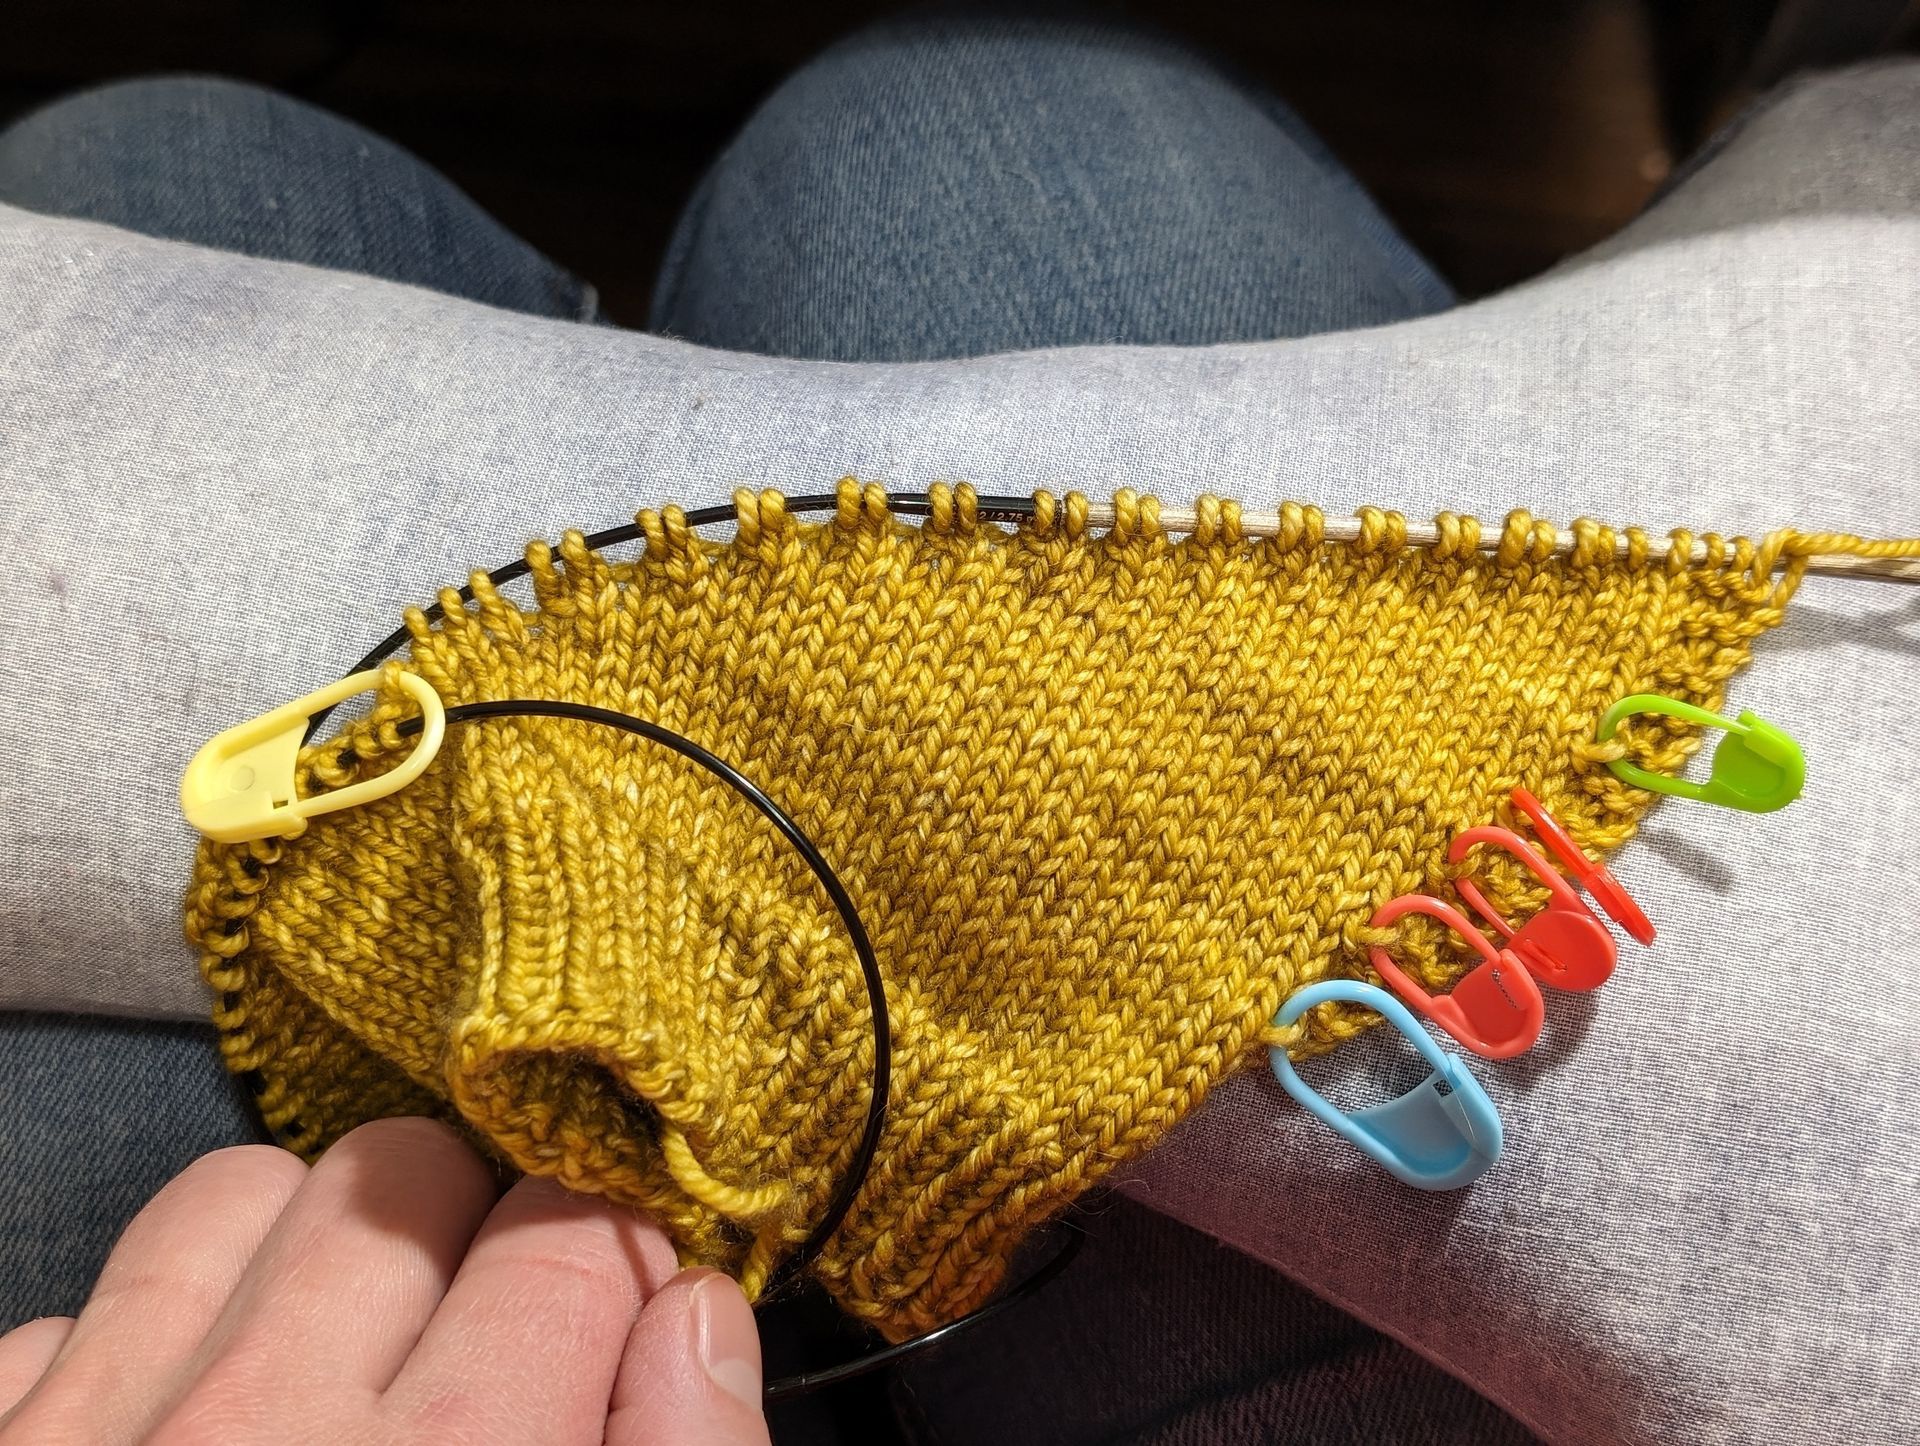
The picture below shows what your sweater will look like once all short rows are complete and you are ready to continue.
Row 28: K across all st, resolving wrapped st as you come to them and removing the center marker.
Row 29: P to end.
Row 30: K to end.
Rows 31- 44: Repeat Rows 29 and 30 7 more times (or to desired length)..
Rows 45-55: P1k1 to end, matching pattern on WS and RS.
Bind off in pattern and break yarn, leaving a long tail for sewing. Weave in all ends except the long tail (we'll use that).
Finishing
Soak the sweater and block gently, without stretching.
Place the sweater on the dog. Thread the long tail of yarn at the hem of the sweater on to a tapestry needle and stitch the sweater closed at the dog's belly with mattress stitch.
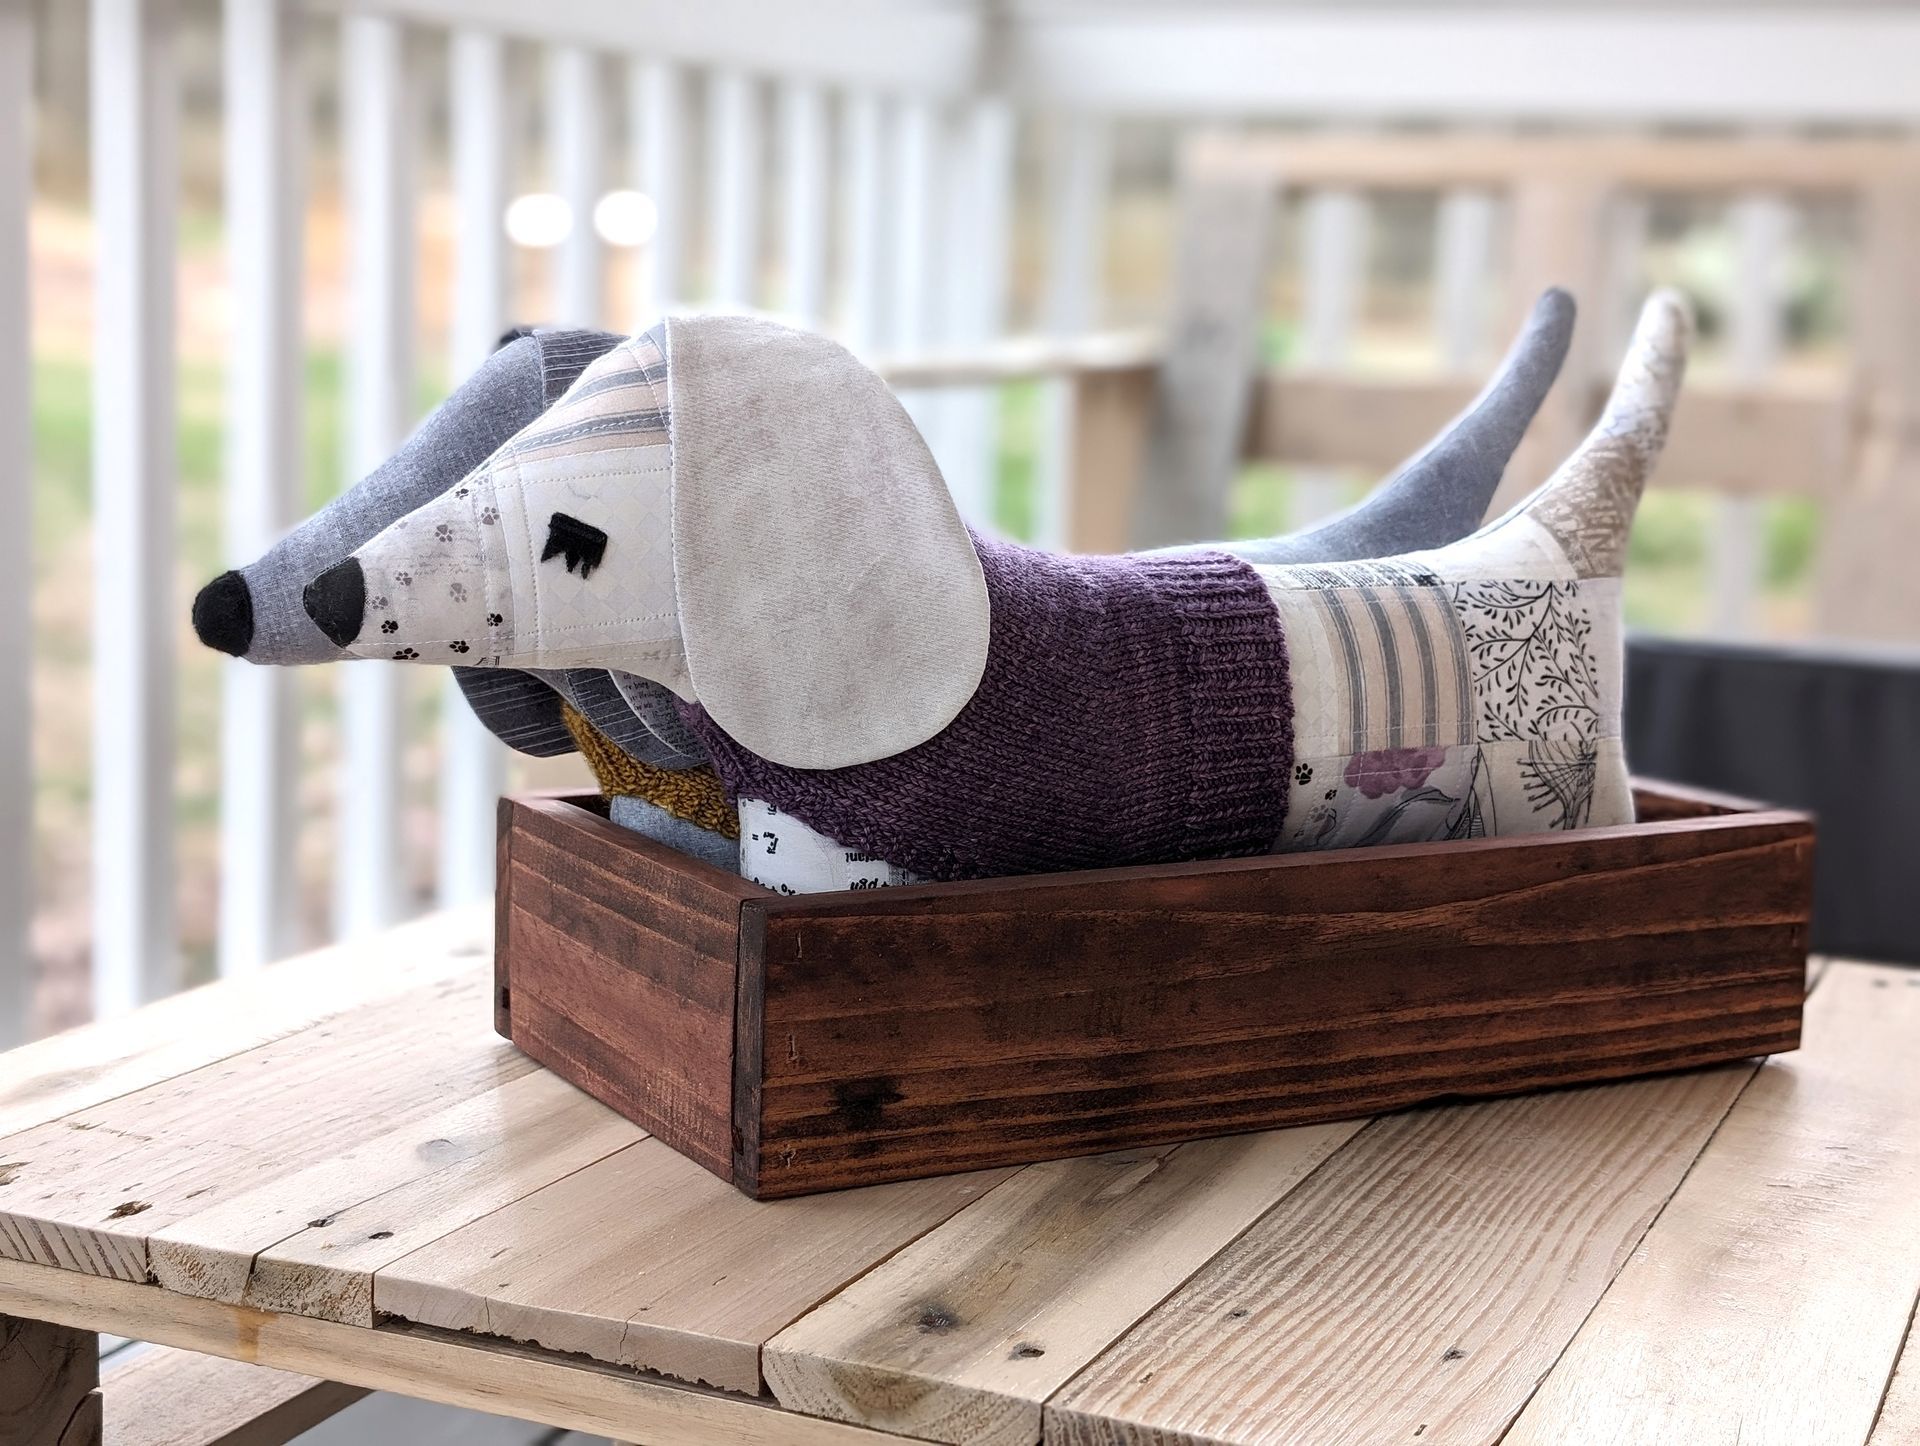
Since I was donating these to a benefit auction, I made a simple box out of pallet boards to display them in, staining the wood with Minwax red oak.